This document describes how to rebuild the 1970-and-up D0OZ-2B257-C and D7DZ-2B257-A Kelsey-Hayes brake pressure differential valves by replacing the internal parts that typically wear out after years of service. Tools needed:
|
|
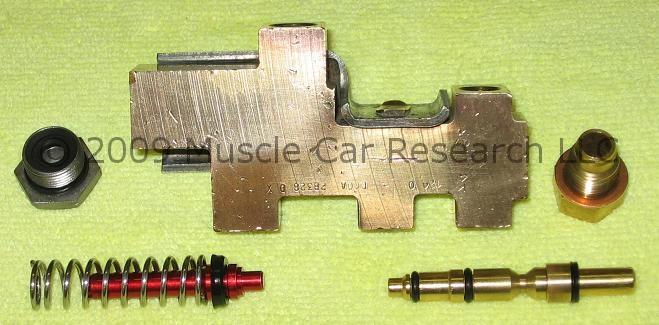
The rebuild kit provided by Muscle Car Research LLC includes the following parts:
|
|
|
The Kelsey-Hayes valve is identified by a Ford engineering number that is stamped into the body of the valve. The parts in this kit can be used to rebuild the following valve (identified by both service part number (where known) and engineering part number):
| Valve Type | Service Part Number | Engineering Number(s) |
|---|---|---|
| Pressure Differential Valve (Combination Proportioning and Differential Valve) |
D0OZ-2B257-C | D0OA-2B328-D D2ZA-2B328-AA |
| D7DZ-2B257-A | D7DA-2B328-AB |
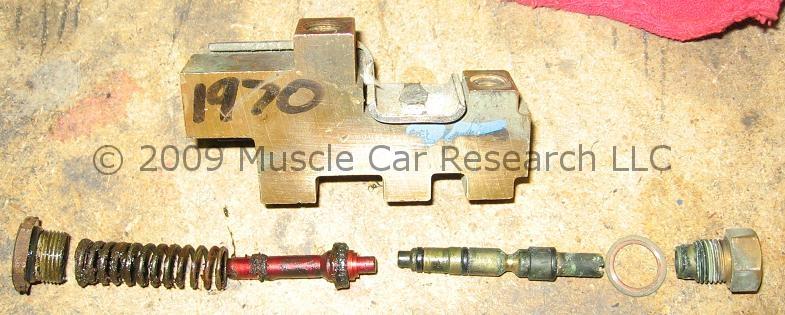
Arrange your valve, tools, and rebuild kit on a clean work surface. Let's get started! The first step is to inspect the valve and make sure that the exterior is undamaged. Check the port threads for damage. Make sure the valve is securely attached to the mounting bracket. The large bolt on the bottom of the valve is often rusty and pitted, but it can typically be reused if you don't have a better one. A loose mounting bracket can be tightened up by lightly tapping the brass mounting tab with a ball peen hammer. If any of the brass port threads are stripped or damaged you're better off finding another valve. If your valve passes the exterior inspection you're ready to disassemble it and inspect the internal parts.
Disassemble valve:
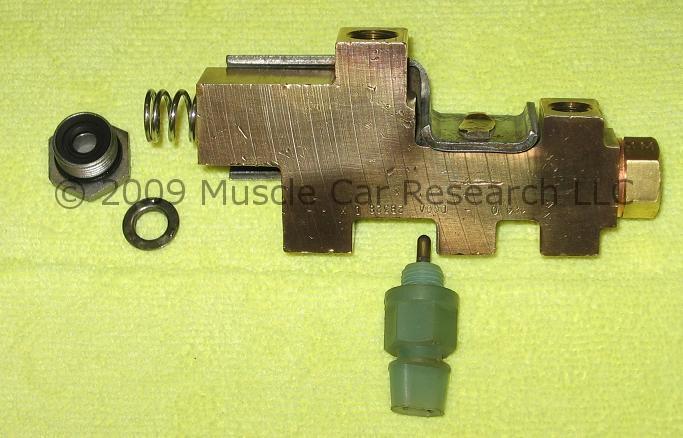
Use the wrenches or sockets to remove the brass fitting, steel plug, and the warning lamp switch. Remove the two pistons using the needle nose pliers. If the pistons don't come out easily it may help to soak them overnight with penetrating oil. Here's what you'll see (hopefully yours isn't quite so dirty):
Inspect the bores once the pistons have been removed. If the bores aren't perfectly smooth you should either replace the body or have the bores professionally sleeved.
Remove old rings and seals:
Remove the old rings and seals from the disassembled parts. A dental pick makes it easy to get under the o-rings.
Clean parts:
Soak the brass parts, including the body of the valve itself, for a few hours in a container of liquid ammonia. Ammonia does a great job of removing tarnish from brass, but be careful of the smell! Remove the parts, flush with water, and polish with steel wool. Clean the bores of the valve with the bore brush and make sure that the bores are perfectly clean - any dirty residue that lingers in here can cause a leak! Finish cleaning the brass parts using alcohol and cotton swabs.
The steel plug can be cleaned with a wire wheel or by bead blasting. Rinse with alcohol when finished.
Install new rings and seals:
Install the new seals from the kit as shown in the picture below. Dip each seal in clean brake fluid to lubricate it prior to installation. Be careful to not twist the seals when installing them. Pay special attention to the orientation of the piston seals: if used, the u-cup that's installed in the steel plug must be installed facing up, and the piston seal installed on the proportioning valve piston (the red piston below) must be installed with the flat side towards the short end of the piston. Don't put the u-cup on the piston or the piston seal in the plug!
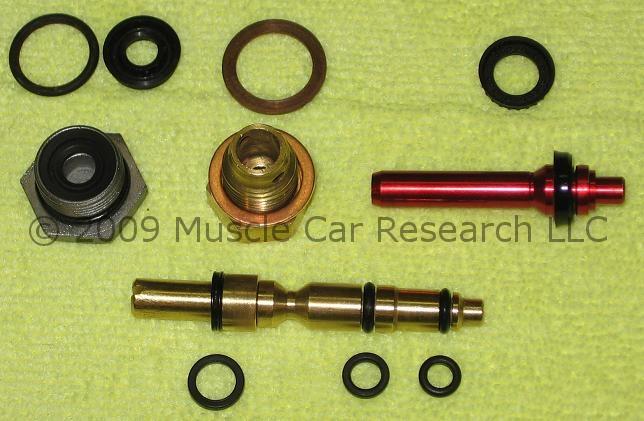
I find it easier to install the middle o-ring on the distribution block piston (the brass piston below) after first installing the small end o-ring. The small ring then acts as a bridge so the middle ring doesn't get caught in the small ring groove. Note the order of the rings: x-ring on the left, medium-sized o-ring in the middle, and smallest o-ring on the right.
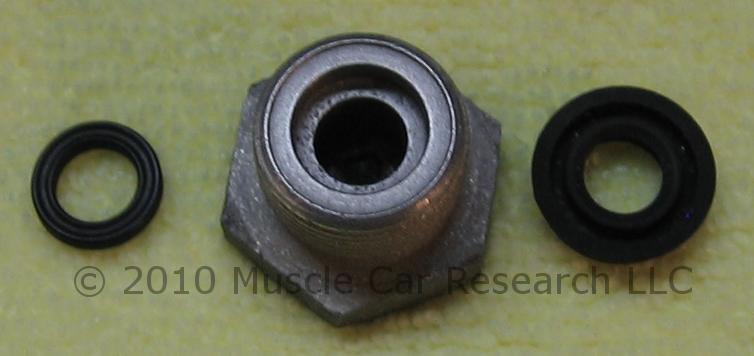
The D7DA-2B328-AB valve uses an o-ring in place of the u-cup seal found in the earlier valve. The rebuild kit sold by Muscle Car Research replaces the o-ring with a quad ring that provides two sealing surfaces instead of one. The difference in the two seal types is shown in the picture below.
Reassemble valve:
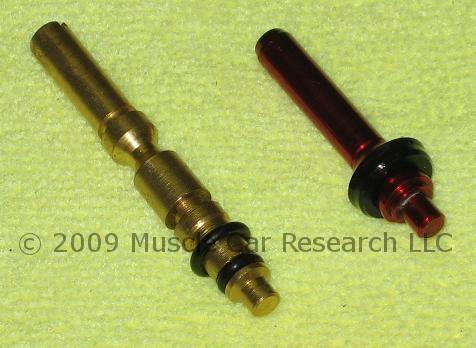
Align the piston assemblies as shown in the picture below. Insert the proportioning valve piston (the red piston in the picture) as far as it will go.
Insert the distribution block piston (the brass piston in the picture) only as far as it takes to align the groove in the piston with the warning lamp switch port in the valve body (the middle port on the body in the picture). The piston should move with moderate pressure. Remove the piston and check for twisted seals if it seems too tight. The probe on the switch needs to fit in the groove without touching the sides of the groove. Note: be sure to push (a dental pick does the trick) the outermost x-ring seal on the piston down far enough to clear the fluid port - if you don't, you will have a leak from the switch port! If you make a mistake here you will either have a leak or your brake warning lamp will be lit and you'll need to center the valve by bleeding the brakes as described in your Ford service manual. Install the brass port on the top of the valve and tighten only enough to form a positive seal with the copper crush washer.
Install the spring behind the proportioning valve piston. Place the metal spring cap on top of the spring (the ridges on the cap fit inside the spring) and install the steel plug. Tighten the plug only enough to form a positive seal with the o-ring. Install the warning lamp switch.
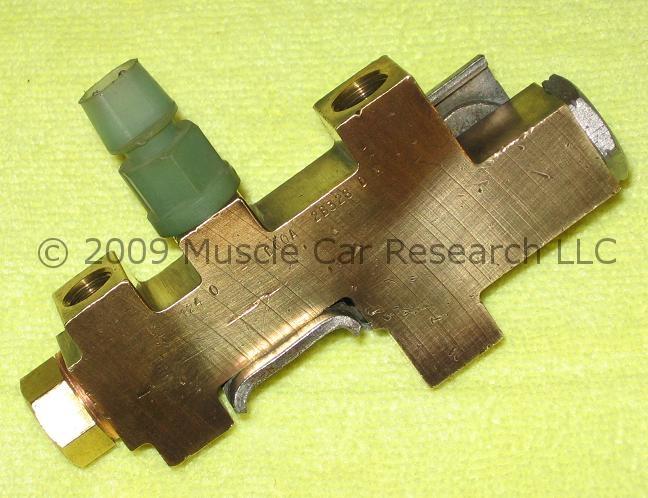
That's it! Your finished valve should look like the one pictured below.
Now you can reinstall the valve in the car and reconnect the brake lines to the valve. Start each line by hand as best you can to ensure that the fittings are threading in straight and smooth. Be careful - it's easy to cross-thread the fittings and damage the soft brass threads. Tighten each fitting with a flare nut wrench. You may need to tighten, loosen, and retighten each fitting multiple times to obtain a leak-free seal. Add brake fluid, bleed the brakes, and check for leaks.
- Log in to post comments